Syncing your files to SharePoint gives you the ability to keep documents up-to-date and all of your documents and data are in one place.
Reasons why you need your local file system when you sync files to SharePoint
Generally, when you are moving to the Microsoft Office 365 and SharePoint Online cloud, there are a lot of reasons to keep your local file system. For example:
- To quickly access files with non-cloud-based applications or legacy systems
- To work offline and with increased performance and without internet connectivity
- For integration into local business processes
- For compliance reasons (in many cases you simply have to own your files locally)
- As some kind of local backup (or to manage "cloud" backup with common backup software)
But you don't have to miss the benefits of the cloud, like web-based search, versioning, change notifications, workflows, mobile access etc. Best to set up a hybrid scenario in this case. You can centrally synchronize pre-selected parts of your local file system, and even file server Shares, network drives or NAS directories with a SharePoint Online, Office 365 or OneDrive for Business document library in the cloud.
Let's have a look at how you can sync files to sharepoint step-by-step using the Layer2 Cloud Connector. And how to overcome the limitations of the free Microsoft OneDrive for Business Client.
Step by step instruction to sync files to SharePoint from your local file server
1. Select parts of your file share to sync with Office 365
Assuming you have a file system, mapped network drive like this with some files and folders:
Fig. File System to synchronize with the Microsoft Office 365 Cloud - also works for local folders.
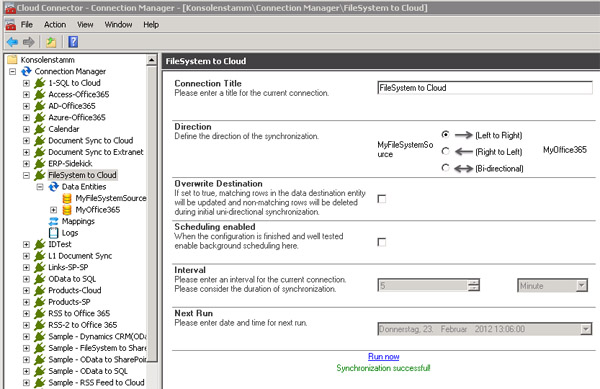
You first have to setup the connection definition in Layer2 Cloud Connector, for example "FileSystem to Cloud":

Fig. Connection definition for Filesystem to cloud replication, unidirectional in this example.
Please note:
- There is a bi-directional option available to sync back changes done online in the SharePoint library back to the local file server.
- There is an overwrite option to use for cleanup, if your library already contains some data.
- Do not enable scheduling at this point. Please enable scheduling later on, when all tests are passed.
As a next step you have to setup the data source of the newly created connection as follows. Afterwards you can sync files to sharepoint with just a click.
2. Define your local file system as data source for Office 365 replication

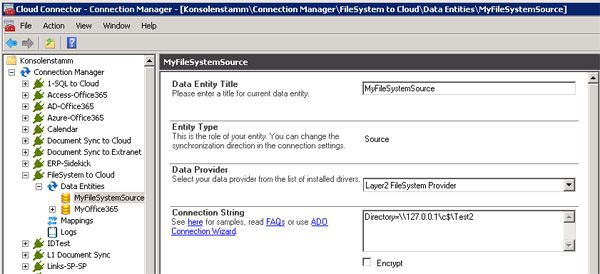
Fig. Example file system data source configured for replication to Office 365.
Please note:
- Select the Layer2 FileSystem Provider as Data Provider.
- Enter the source directory (root) "Test2" with the notation Directory=C:\Test2 or similar as connection string. You can also use mapped network drives, e.g. K:\. UNC notation supported as well, e.g. \\myserver\myshare. Please make sure that the current account (for Connection Manager) and service account (for the background update) has appropriate rights to access the shared drive. Note that Windows Services often run with local accounts and have no access to shares by default. You have to modify the accounts and / or access rights for this.
- There are additional options available in connection string for non-recursive replication or to filter specific file types:
- Directory: Root path where the files will be read from (mandatory).
- UserId / Password: Optional credentials to connect to target path. Aliases are User, UserId, User Id and Password, pass, pwd.
- FilenameFilter: Optional search pattern for filtering files by name or
extension. Parameter accept standard windows file search pattern like *, ?.
Aliases are FilenameFilter, FileNameFilter, filenamefilter. (Note that you can
only set one filter pattern for this parameter.)
Examples:
*jpg = file extensions
Layer2* = Files which begins with Layer2
*Layer2* = Files that contain Layer2 - SQL-like query is supported to include or exclude folders and files to / from sync by name (including like or wildcards), type, size and date.
3. Define a SharePoint library in Office 365 as data destination for your file system
Now you can create a SharePoint library in the clound, e.g. "FileSystem" in this sample. As a next step you have to setup the data destination of the newly created connection as follows.

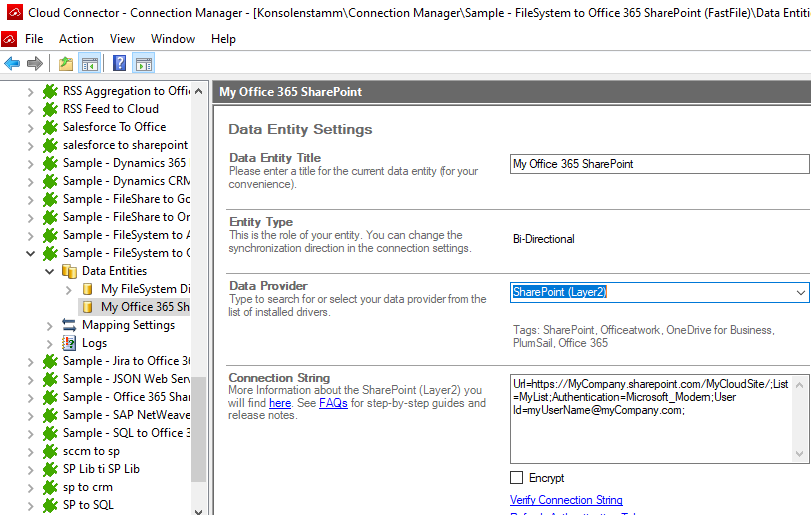
Fig. Example data source to replicate a part of a file system to Office 365
Please note:
- You have to select the Layer2 Data Provider for SharePoint (CSOM) or the Layer2 Data Provider for Office 365 Fast File Sync to communicate with the Microsoft cloud using web services.
- Setup the connection string for example
as:
Url=https://mydomain.sharepoint.com/sites/mysite/; List=myDocumentLibrary; Authentication=Microsoft_Modern; [email protected]; Pass=myPassword - There are other authentication methods available, if required. See User's Manual for this.
- The URL goes to the site that hosts the library. As List parameter enter the library name or title.
4. Setup field mapping for file system metadata
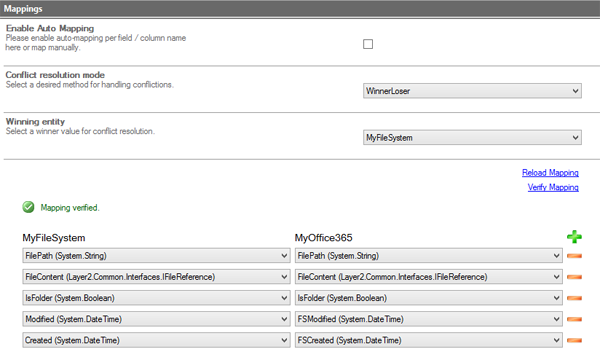
To map the file system files and metadata to your SharePoint library you can simply use the "Auto-Mapping" feature or map the fields manually - as shown below.
 Fig. Field mapping example to sync
file system meta data to a SharePoint library.
Please note:
- You can generally map file system metadata as Created / Modified to the corresponding SharePoint fields. But note: Writing to SharePoint system fields (Modified requires specific access rights and can cause replication issues. We strongly advise to map such fields to custom columns, like FSCreated, FSModified, etc.
The custom fields must be created before mapping. - Please be careful when mapping author/editor data to the SharePoint metadata fields. In some cases, the user tokens are not the same between file system and the cloud accounts, and may lead to warning about missing users in SharePoint.
- If you can't find some list columns in mapping, they are not exposed in the view you are using for sync. If you don't give any view in connection string, no view is used and it pulls ALL columns for that library. Better to use specific view for sync. Please add the columns needed there. Remove ANY sorting, grouping, filtering to overcome the list view threshold.
- Office document metadata is propagated by SharePoint automatically in case the columns exist with the same column name. For example, an Author column is populated with the content of an Author metadata field automatically by SharePoint. You don't have to assign such kind of metadata in the field mapping section.
- If using bi-directional syncing, please note the conflict resolution mode (in the Mappings section). Please select depending on your requirements. For more information about the different modes, see the User Documentation under "Conflict Resolution".
- You can also sync your file system with SharePoint lists to only add metadata and backlinks - not the files itself.
5. Access your local files via Office 365 from everywhere
When all connection settings are done and verified successfully, go back to the configuration settings and run the connection first time. After all files are tranferred, you can benefit from your local data replicated to the Cloud.
Fig. Example of SharePoint library with file system content replicated.
Please note:
- To enable document properties (e.g. Created, Modified, Title, Descrition, Author, etc.) promotion to SharePoint columns please take a look here.
- In case of errors while replicating first time, please see the log section. Increase log level for more details, if required.
- Initial replication can take some time, depending on amount of data and bandwidth. Expect 2-4 seconds communication overhead per file plus the upload time. Note that Office 365 limits the upload (and also download) speed.
- Later on, only changed items are replicated. This is much faster compared to the initial replication. Expect around 20-40 seconds to compare metadata per 5.000 files + upload / download time for changed files.
- To setup automatic background replication, e.g. every 24 hours or 20 minutes go to connection settings. Be careful to set sync intervals < 20 minutes (depending on your typical sync duration).
- SharePoint has different file name, type, path or size restrictions compared to the file system. The Cloud Connector will manage almost any different naming conventions by itself.
- Please note the SharePoint list view threshold above 5.000 items in a list or library. This is not an item limit - no problem with sync! Please use an usorted, unfiltered, ungrouped view for replication in connection string. This view can be executed in all cases also above 5.000 items. Please index your columns to execute more complex views. Display your library as flat file list, if required, by removing the folder option in view settings. Use managed metadata navigation, folder navigation and search within large libraries and lists without any restrictions. For best results keep the number of files per folder below 5.000.
- To automate the complete migration process for a large number of user home drives to OneDrive for Business by scripting (including user provisioning and other required steps) take a look here.
- You will have all features of a native SharePoint library or list, including change notifications or workflows on external data change.
Why you should sync files to SharePoint with Layer2 Cloud Connector

The smart file sync solution
If you are looking for a data and file synchronization tool, you should try Layer2 Cloud Connector. This tool is intuitive, secure and with no data limit. You can synchronize automatically in the background, one way or two way - and you can use it even without IT knowledge.
Frequently asked questions about how to sync files to SharePoint
We'll answer the most common questions about SharePoint file synchroniozation here.
What does it mean to sync files to SharePoint?
Syncing files to SharePoint typically refers to the process of establishing a connection between a local file system or a client application and a SharePoint document library.
Why aren´t my files syncing on SharePoint?
The 3 most common reasons why your files aren´t syncing on SharePoint are:
- The synchronization client is not running
- The network connection is unstable
- The storage quota has been exceeded
How do I force SharePoint to sync a folder?
To force SharePoint to sync a folder you need to click "Synchronize now", "Refresh" or "Start" in your synchronization client.

