Keep your SharePoint in sync. Download and try today.
Salesforce Integration with Office 365, SharePoint and others
The Layer2 Cloud Connector can be used to connect and synchronize Salesforce data with almost any other data source codeless and bi-directional. This step-by-step intro shows how to integrate with native SharePoint lists in the Microsoft SharePoint Online / Office 365 cloud. SharePoint on-premise is supported as well. Note that SharePoint is just an example. You can also sync Salesforce to any SQL or other supported data sources.
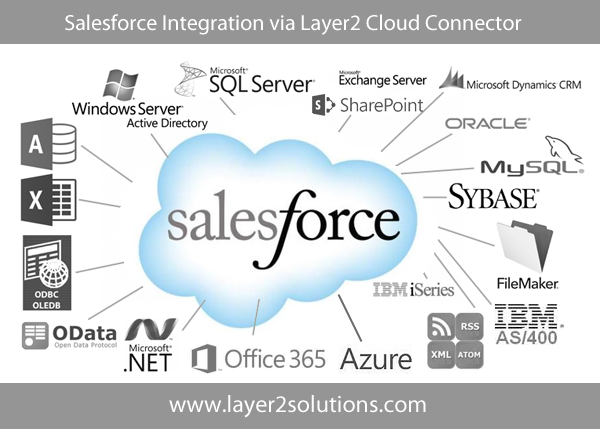
Fig.: You can connect Salesforce data with almost any other data source using the Layer2 Cloud Connector.
You can integrate Salesforce with Office 365 and SharePoint in 5 simple steps without any programming:
- Retrieve a security token from Salesforce. No installation or modification is required on the Salesforce side.
- Install the Salesforce Data Provider in your local system or cloud-based VM.
- Configure the Layer2 Cloud Connector to connect to Salesforce.
- Configure the Layer2 Cloud Connector to connect to Office 365 or SharePoint.
- Configure field mapping and data synchronization options between the data entities.
Salesforce Integration - Get the security token
As a pre-consideration to integrate your Salesforce with Office 365 you have to register for the Salesforce Developer Edition. Please note that this is not about programming, but just to receive the required Salesforce Security Token later on.
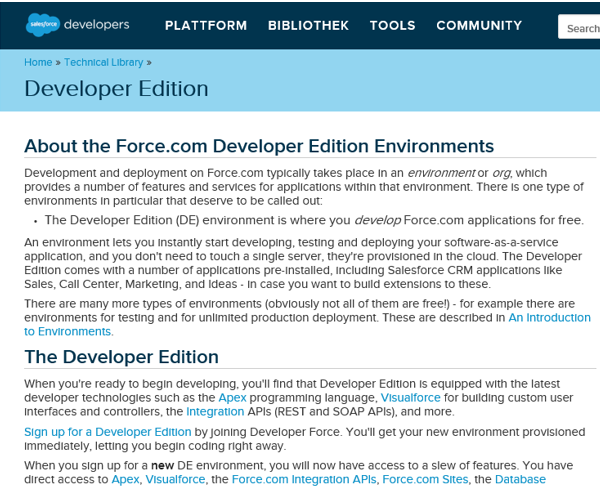
Fig.: Please register for the Salesforce Developer Edition to receive your Security Token.
You will receive a registration mail. Please login as provided and goto My Settings.
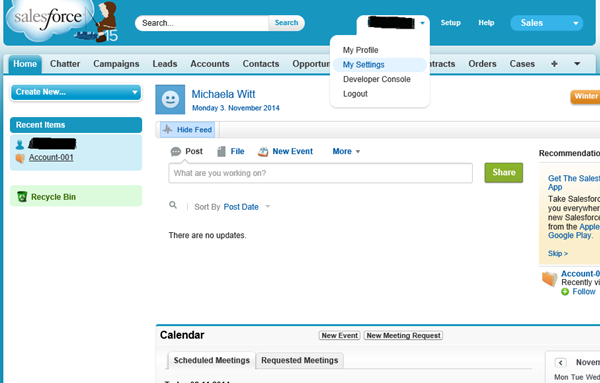
Fig.: Go to Salesforce My Settings to receive a Salesforce Security Token.
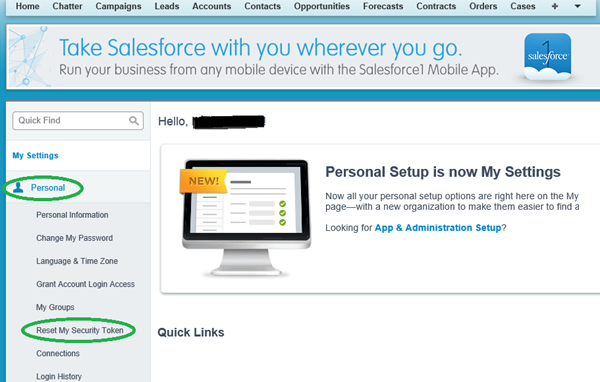
Fig.: Reset the Salesforce Security Token to use in the Layer2 Cloud Connector.
You will receive an email with your user name and security token. Please note that your password and the security token are different items.
Installation of ODBC Data Providers for Salesforce
Generally you can make use of different data providers from several vendors to connect to salesforce using the Layer2 Cloud Connector:
Progress Data Provider (advised):
Please download the trial version of the driver from:
https://www.progress.com/products/data-sources/salesforce-odbc-jdbc-drivers
You need to register for the download). Unpack the
PROGRESS_DATADIRECT_CONNECT_ODBC_7.1.4_WIN_32.zip file and run setup.exe. Read /
Write access verified by Layer2. There open issues with insert operations
(driver related). Please make sure to use 32-bit or 64-bit version - the
architecture must fit to the Cloud Connector version installed. Create a System
DSN ODBC connection to make use later on for background sync.
DevArt Data Provider (alternatively):
Please download and install the DevArt ADO.NET Provider for
Salesforce as 30-days trial. Execute dcsalesforce.exe for installation.
Please note that this provider must be licensed later on additionally to the
Layer2 Cloud Connector.
Salesforce Integration - Configure the Salesforce connection
As a sample we are going to integrate the Salesforce Accounts list.
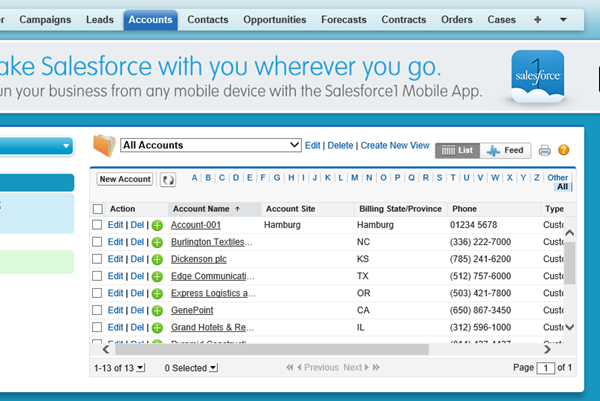
Fig.: Salesforce accounts to be synchronized with Office 365, SharePoint or other systems.
You are now ready to configure the connection to Salesforce in the Layer2 Cloud Connector. Click "Create New Connection" and carefully setup the direction of sync. You can enable scheduling later on.
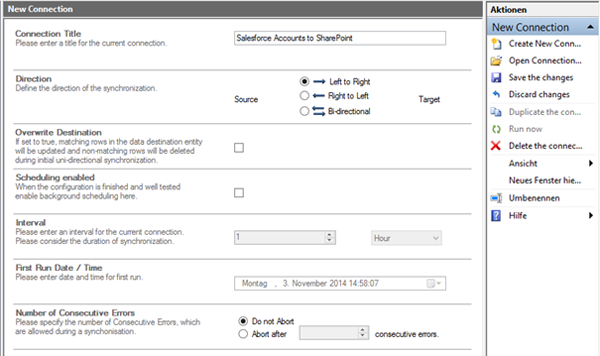
Fig.: Setup the connection to salesforce in the Layer2 Cloud Connector.
Now you have to configure the Salesforce data entity as follows:
- Data Entity Title: Enter as you want.
- Entity Type: Source in case of this uni-directional connection. You can set at the connection's page.
- Data Provider: In case of DevArt select dotConnect for Salesforce or other (depending on vendor). If it does not appear in the list it is not installed or does not fit to your Cloud Connector version (32-bit / 64-bit). Please install again in this case. For Progress / Data Direct create a System DSN entry using the DataDirect 7.1 Salesforce driver.
- Connection String:
Host=login.salesforce.com;
User ID=<email-address> to be replaced with your salesforce user id (email-format);
Password=<password> to be replaced with your salesforce password (not token);
Security Token=<token sent from salesforce> to be replaced with the Salesforce security token - Select Statement: In this sample "select * from Account". You can query all Salesforce objects and make use of standard ANSI SQL, e.g. using where conditions.
- You don't have to enter any primary key (it is managed automatically).
You will find more documentation here.
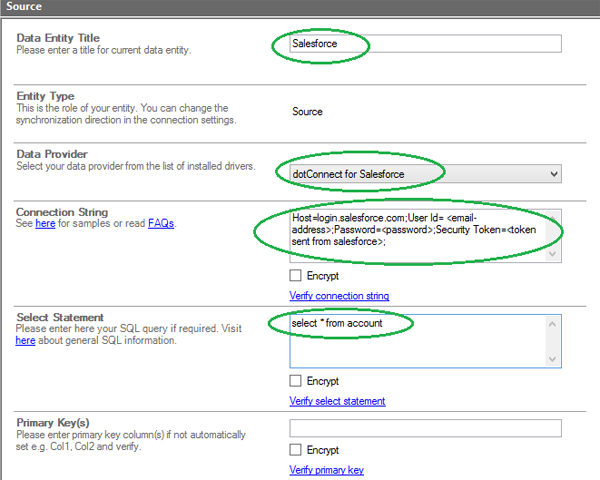
Fig.: Sample Salesforce connection in Layer2 Cloud Connector.
Please verify all settings and display the preview data.
Salesforce Integration - Office 365 or SharePoint Connection
You have to create the SharePoint list to host your Salesforce data manually before connect. Please add appropiate fields or use pre-configured list types, e.g. contacts in this case.
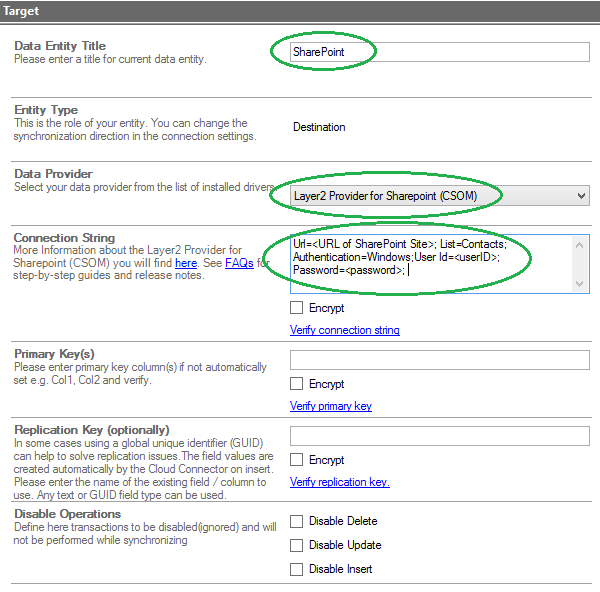
Now you can connect the SharePoint data entity as follows:
- Data Entity Title: Enter as you want.
- Entity Type: Destination in case of an uni-directional connection. You can setup at the connection's page.
- Data Provider: Select Layer2 Provider for SharePoint to connect to SharePoint or Office 365.
- Connection String:
URL=<URL of SharePoint Site>
List=<your List name or title>. In this case a contact list "Contacts"
View=<your View name or title>. Not used in this case, but helpfull to provide certain fields only and sync more than 5.000 items.
Authentication=<Your Authentication Method>. Windows in this case, can also be "Office365" or "ADSF". See below for more details.
User ID=<userID> Your SharePoint Login
Password=<password> Your SharePoint password - There is no select statement here, but views should be used instead of.
- No need to give a primary key here, SharePoint Item ID is used internally.
- While writing changes to your SharePoint list you can disable insert, update or delete operations, if required (e.g. for data aggregation or archiving).
You will find more details in the Layer2 Data Provider for SharePoint specification.
Please verify all settings and display the preview data. As a next step you can map your source data fields to columns in the data destination. In this sample you can't use auto-mapping (based on field names) because names are different in Salesforce and SharePoint. Please also note the mapping of the SharePoint Title field (required in SharePoint).
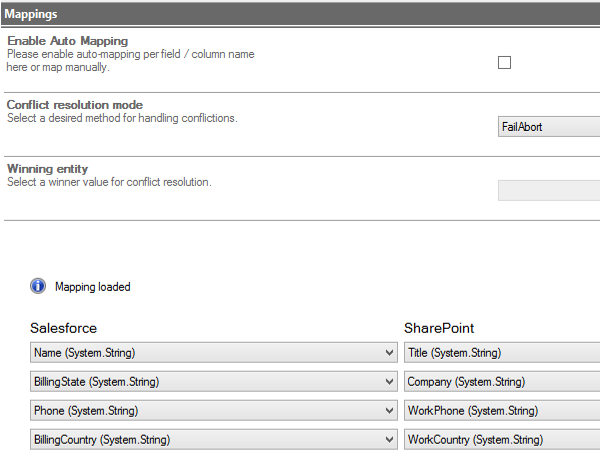
Fig.: Field / Column mapping between Salesforce and SharePoint
Now you are ready to run the first synchronization as follows:
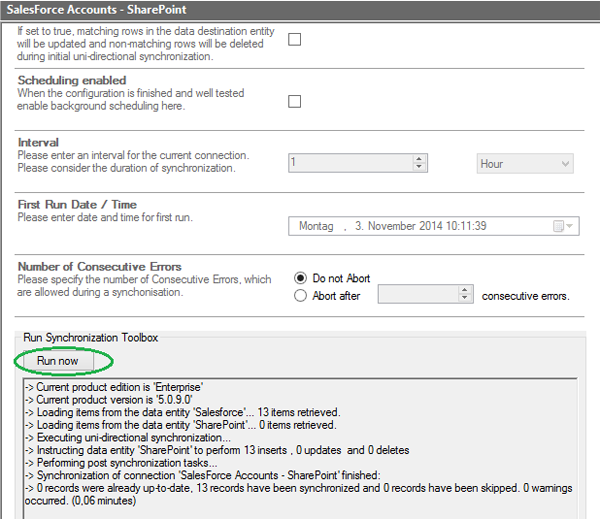 Fig.: Manual synchronization between
Salesforce and SharePoint (first run). You can sync changes
automatically in background later on.
As expected contact items are inserted into SharePoint. In case of error messages follow the instructions, e.g. improve field mapping. Please note that the first sync can take a while, depending on amount of data. If all looks good, please run sync again. You should have no changes in SharePoint in case there were no changes in Salesforce. If you see changes (e.g. all items changed with each run) your configuration does not work as expected, e.g. because of invalid data type conversions. Please improve configuration (e.g. column types). When all works as expected, you can enable scheduling. Please make sure that your Layer2 Windows Service is up and running to process the changes in background. No need to have the Connection Manager open or being logged-in at the computer.
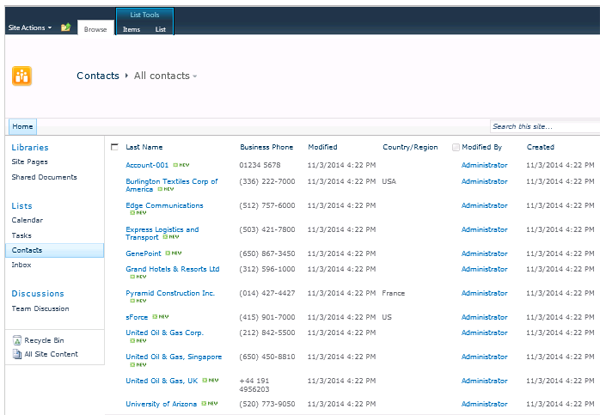
Fig.: Salesforce account data synchronized with SharePoint contacts.
In this sample SharePoint Server on-premises is used to connect to Salesforce, but it works in the same way with new SharePoint Server versions or SharePoint Online, Office 365 - or almost any other data source.
Salesforce Integration - Next Steps
Please note:
- The background replication interval is set to 60 minutes in the configuration file by default. Can be changed later on as required.
- Bi-directional replication can also be used. That means, you can write-back
changes in SharePoint to Salesforce (if supported by the data provider and
access rights). You have to specify a primary key in the Cloud Connector
connection settings for the Salesforce data entity that:- Is writable in Salesforce- Is NOT auto-incremented (so Salesforce RowID would not work for example)- Is unique- Is always filled (no blanks allowed)
You could for example use the email-address or a customer-number, if they meet the mentioned pre-requisites. There is no need to use the same key field on both sides, so you could for example use email-address as key for Salesforce and item ID as key for SharePoint. - You can specify one-way replication as well, if required (see manual), e.g. in a migration scenario.
- Automapping is disabled here because the fields in Salesforce have different names compared to the SharePoint contact list.
- You have to generate an Access Token in your Salesforce settings to enable SalesForce API usage.
- It's not about bulk import: Only changed items are modified in the connected systems. Means workflows and notifications on data change can be used on both sides, SharePoint and Salesforce.
- You can have unmapped fields on both sides to host information on one side only, e.g. pictures or other attachments on SharePoint side.
- On the SharePoint side ALL usual list features are supported, e.g. views, lookups, offline replication with Outlook, mobile access, metadata assignment etc.
- The replicated items are fully integrated with SharePoint search (because they are in a native SharePoint list ;-)
- No programming was required to setup.
- In the same way you can replicate to almost any other data provider, e.g. to SQL, other CRMs etc. Simply replace the data entity section of the configuration as required.
- Your SharePoint users do not need any Salesforce licenses as they work with a data copy only.
- You will have maximum performance, reliability and security on the SharePoint side. SharePoint users do not require any access to Salesforce.
Please contact [email protected] if you have questions about connect, sync, integrate, replicate or migrate to and from Salesforce. You can register for a free download version of the connector here.
Ready to go next steps?
