Get a free trial of Layer2 Cloud Connector
How to connect Active Directory with SharePoint
Synchronize data stored in your Active Directory to a SharePoint Online List in Office 365 by using Layer2 Cloud Connector.
Integrate your existing data with Office 365 to improve your processes.
Data integration and synchronization made easy
If you haven't already tried Layer2 Cloud Connector, it's time to take the first step towards effortless connectivity. Start your Layer2 Cloud Connector trial and experience how easy it can be to connect Active Directory to SharePoint.
Connect your Active Directory step-by-step
You learn how to configure your Active Directory and how to configure Layer2 Cloud Connector. We provide you with practical hints and known issues for a smooth start.
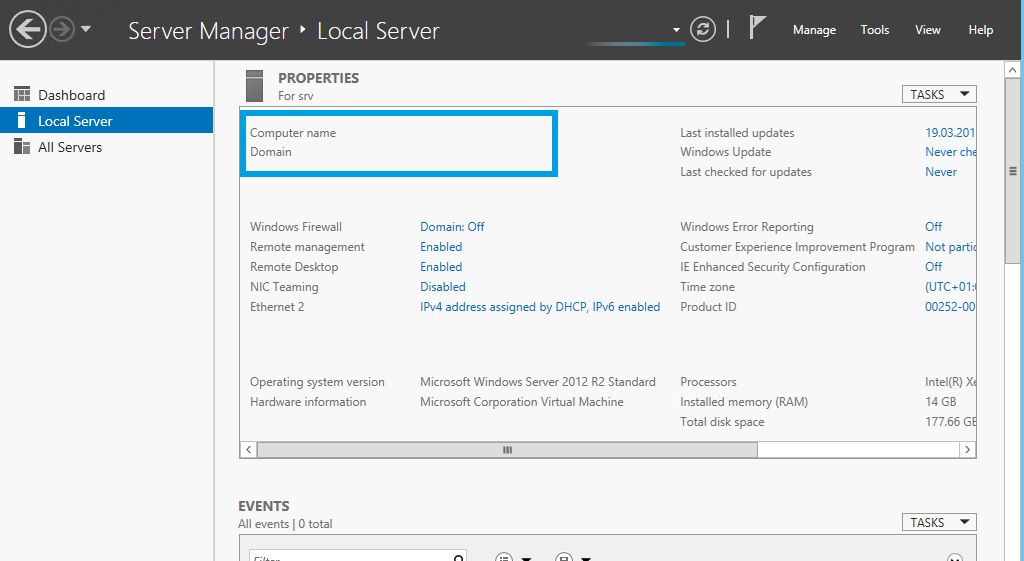
Step 1 - Getting your Active Directory server info
To connect to Active Directory, you are going to need the server name and the domain controller name. You can find this information in your Server Manager/Local Server.
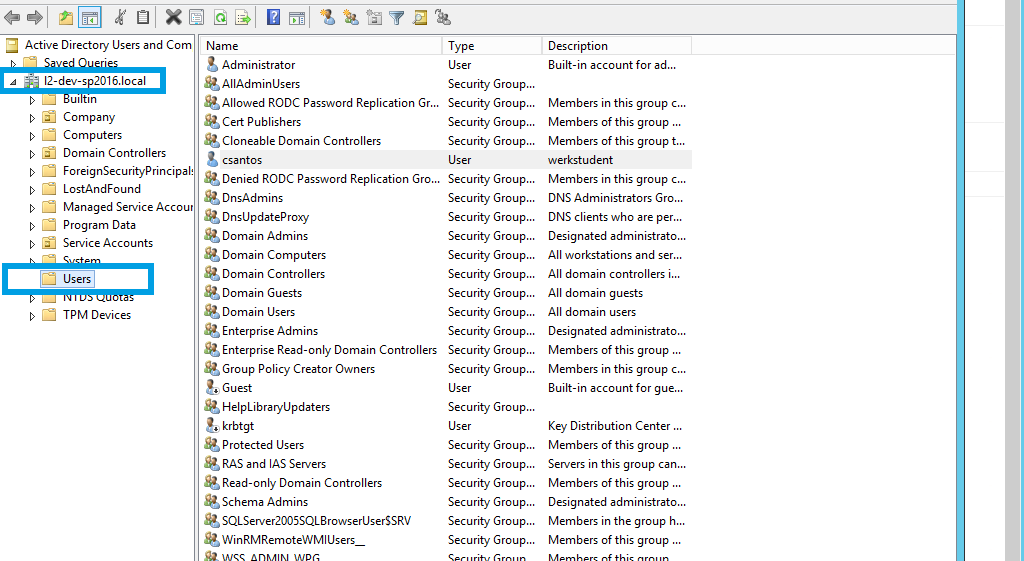
Step 2 - Getting your directory DN
We also need the Base DN. The Base DN is based on the directory you want to set to be the root directory for searches and the DC. In our case, Users will be the root directory.
The last we need is an user account with the rights to access the Active Directory. If you are reading and writing, make sure your user has the rights to.
Step 3 - Creating a new connection
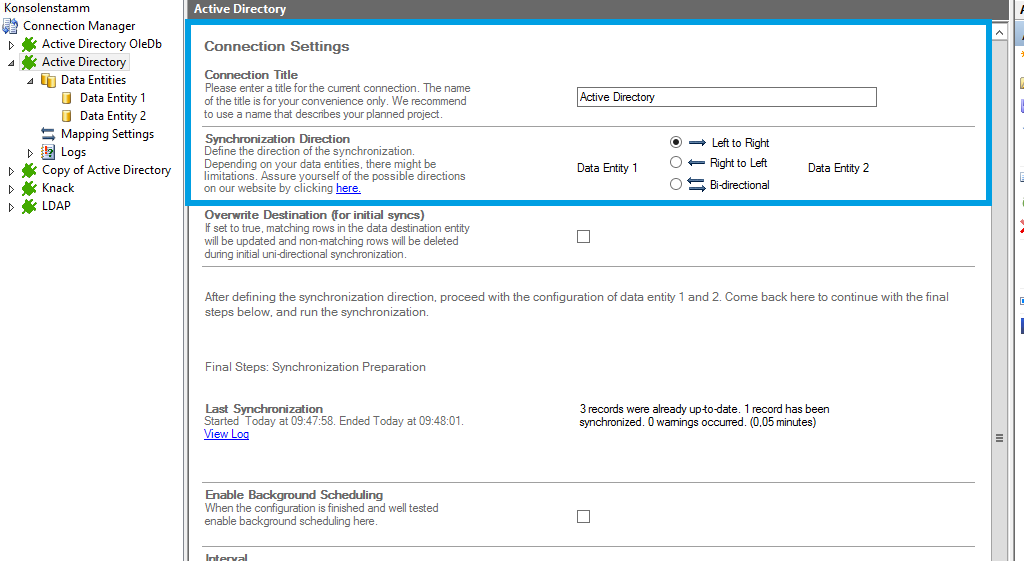
Create a new connection using the Create New Connection option in the Actions pane on the right. It will appear at the bottom of the Connection Manager List on the left. Click it to open the configuration settings.
Give it a meaningful name by replacing New Connection as the Connection Title.
Initially, make the connection uni-directional (Left to Right) to ensure data consistency before switching to bi-directional. You can change this setting after successful initial synchronization.
Step 4 - Configuring the connection to Active Directory
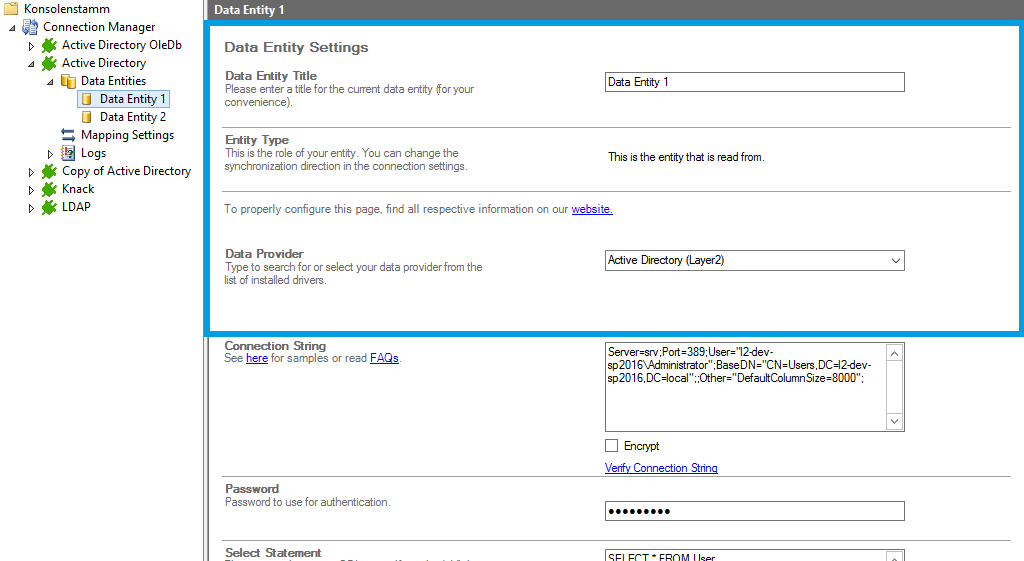
Go to the data entity “Data Entity 1” to open the configuration settings und specify a meaningful Data Entity Title.
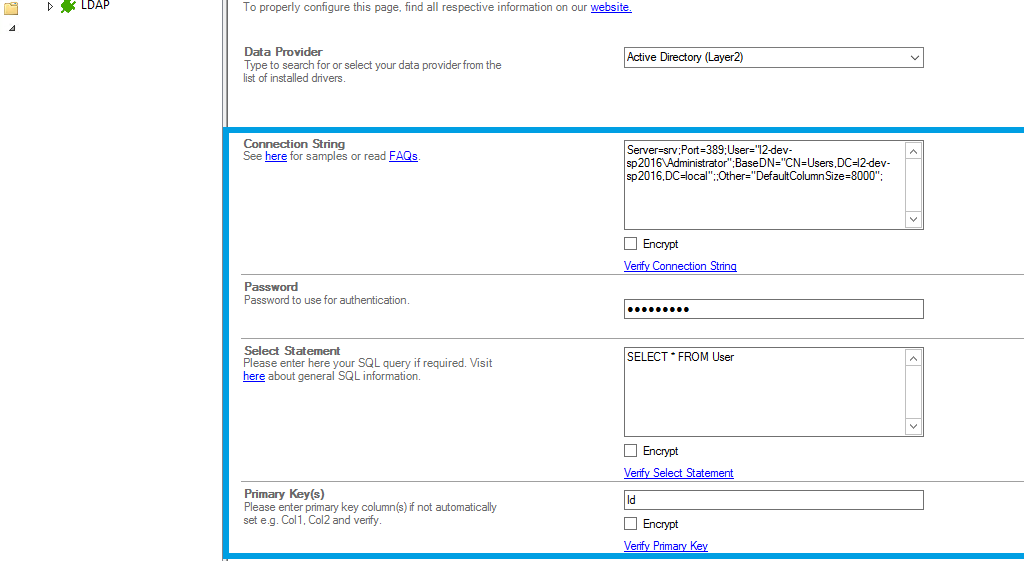
Select the Data Provider for Active Directory from the data provider list. You can search for Active Directory by typing into the selection box.
Step 5 - Creating the Active Directory connection string
For the Connection String, we need the information mentioned in step 1. You can copy the below connection string and adjust it.
Server=srv;Port=389;User="l2-dev-sp2016\Administrator";BaseDN="CN=Users,DC=l2-dev-sp2016,DC=local"
| Server | The server name we are connecting to from Server Manager in step 1. |
| Port | Port to connect to. This is the default port. |
| User | The user with permissions to access Active Directory |
| BaseDN | Enter the information we gathered in the first step. The root folder users is set as CN and the DC to separated DCs for each "dot" from the sub DC. |
Enter the user account's password into the Password field. The field masks the value for better security.
Step 6 - Specifying a select statement
The Select Statement text box is used to define specific data queries. We will be gathering all information from the User table. You can copy the below select statement and adjust it to match your needs. Save your changes by using the right-hand pane option Save Changes.
SELECT * FROM User

Step 7 - Verify your configuration
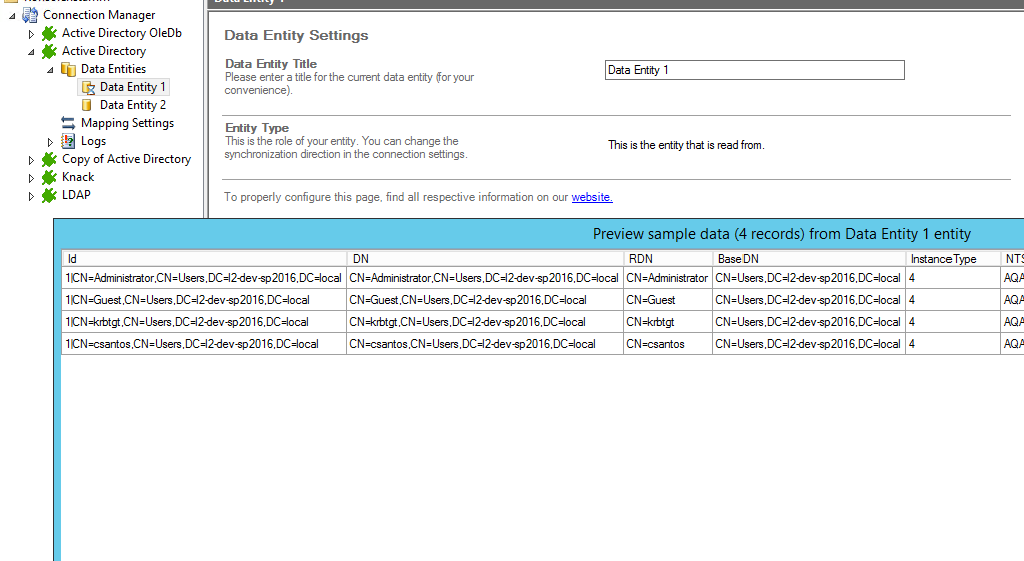
To make sure everything is configured as you expect, you can use the Preview Data option on the right-hand pane which will provide you with a pop-up window showing you sample data from your Active Directory entity.
Step 8 - Connect to SharePoint
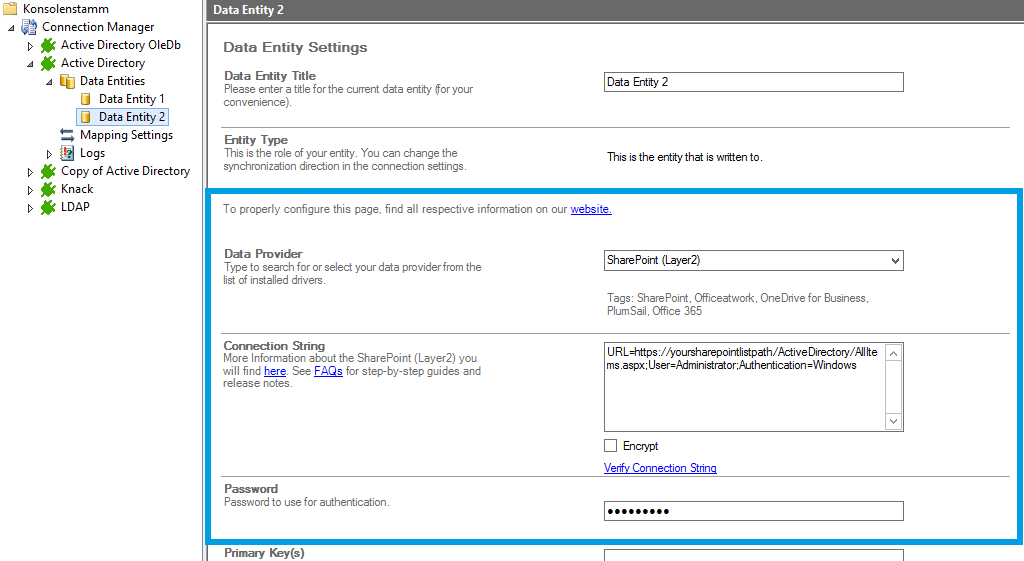
Use the left-hand pane to switch to the data entity "Data Entity 2". We will be using the Layer2 SharePoint Provider for this setup.
You can copy the below Connection String which contains the minimum of required properties to connect to your custom SharePoint Online list.
URL=https://your_custom_sharepoint_list_url/AllItems.aspx;Authentication=Microsoft_Modern
| URL | URL to your SharePoint list |
| Authentication | Authentication method to be used. In most cases Microsoft_Modern is sufficient. |
Step 9 - Create the mapping
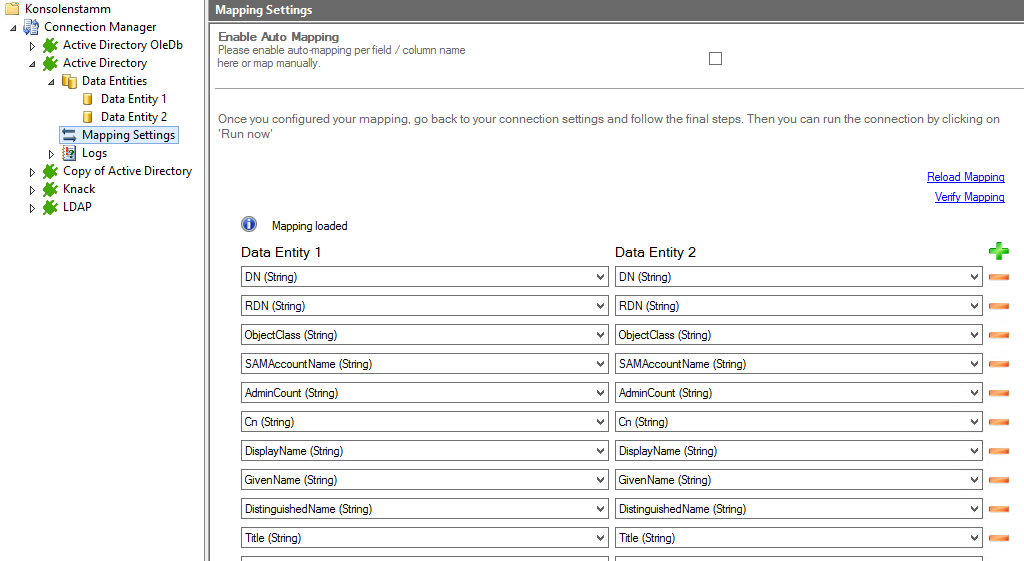
In the next step, we will configure our mapping settings. Click on the Mappings option on the left-hand pane. If your fields from SharePoint are named identical to the fields from your source system, the Enable Auto Mapping option will match those columns. Disabling this option allows you to match your columns as needed. Save your changes by using the right-hand pane option Save Changes.
Step 10 - Run it
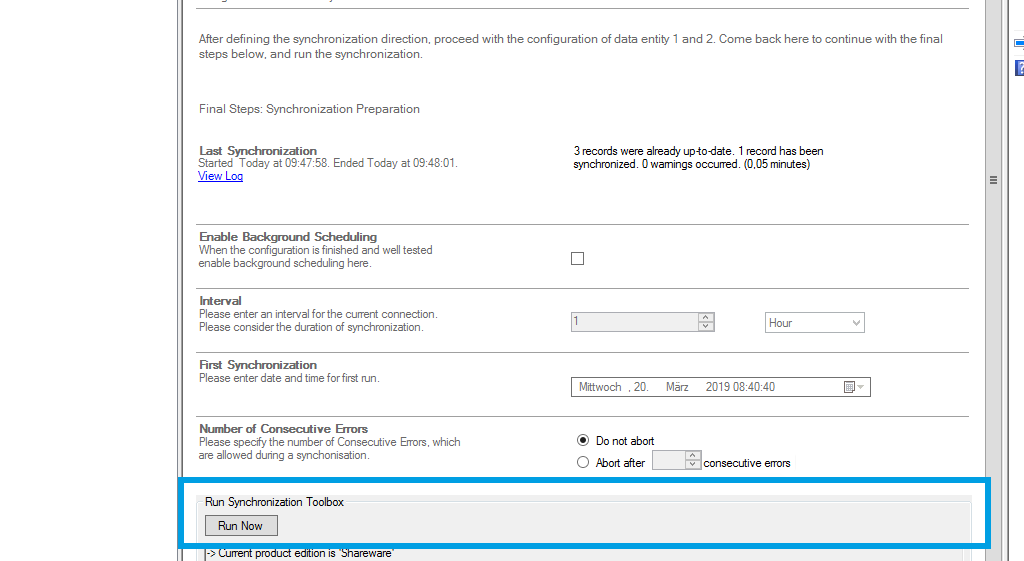
To run your connection switch back to the main connection configuration node and use the Run Now Button located on the bottom of the setup page. The Run Synchronization Toolbox will also display the synchronization process.
Step 11 - See the data in your SharePoint list
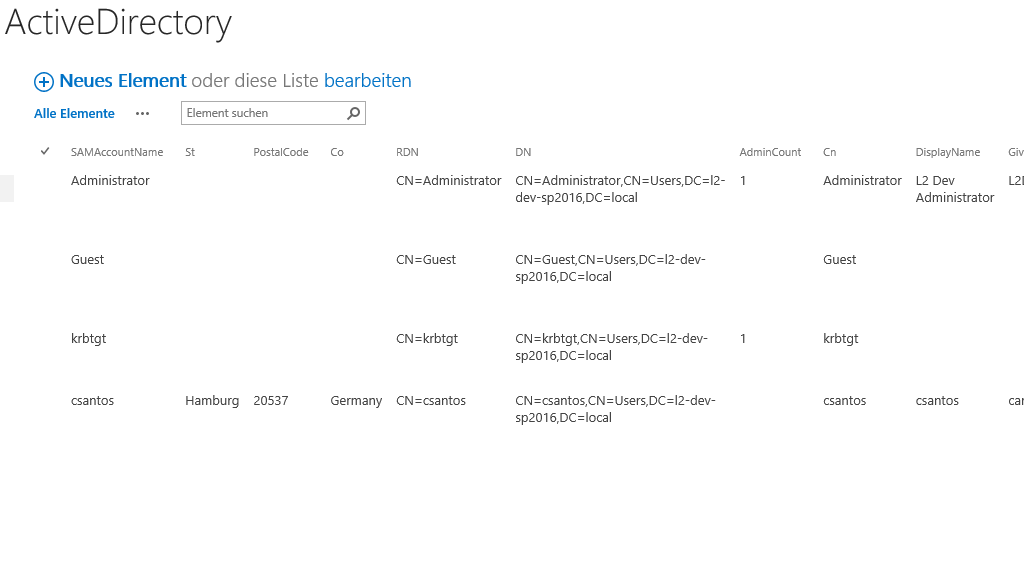
This will be the result in our SharePoint Online list after our initial successful synchronization
Hints and known issues
Connection direction
As far as tested, this connection supports uni-directional as well as bi-directional synchronizations.
After adjusting the direction to bi-directional, you should check your Mappings settings again because some systems might include read-only columns that cannot be mapped directly: CanonicalName and MemberOf should not be set in bi-directional connections. These fields are set automatically through or can only be set in the Active Directory.
We also recommend choosing a Conflict Resolution that matches your environment's needs. You can find out more about the different conflict resolutions in our Layer2 Cloud Connector User Documentation.
Data model
To see all the tables and views you can access with the Active Directory provider, use these queries in the Select Statement:
SELECT * FROM sys_tables
SELECT * FROM sys_views
If there are more tables or views available, you can load them with the option "load more" in the popup window.
DefaultColumnSize
Some columns from Active Directory are very large. If you get some error about the size of a returned value, try to increase the size of the columns through the property Other="DefaultColumnSize=8000". The default value for the column is 2000.


