HOW TO CONNECT QUICKBOOKS WITH SHAREPOINT
Here you will learn how easy cou can connect QuickBooks with SharePoint. This "how-to-connect" documentation will explain the initial configuration of an example connection from QuickBooks Online with a SharePoint Online List in Office 365. We will be synchronizing data stored in QuickBooks Online.
You will also learn more about QuickBooks and SharePoint and the advantages of using Layer2 Cloud Connector. Frequently asked questions about QuickBooks and SharePoint as well as hints and issues of connecting both systems can be found at the end of this page.
If you haven't tried Layer2 Cloud Connector we recommend you to start your free trial now. More about the basic funtionalities of our tool can be found in Layer2 Cloud Connector User Documentation.
Connect QuickBooks with SharePoint step-by-step
You will learn how to configure QuickBooks Online and how to configure Layer2 Cloud Connector. We provide you with practical hints and knwon issues for a smooth start.
Step 1 - prepare the Cloud Connector host machine
When connecting Quickbooks with Layer2 Cloud Connector, a callback URL is required for the authentication process. This URL must use https and point to a unique web address.
Since Layer2 Cloud Connector is not a web application but a local desktop installation, we need to perform a workaround to enable this connection.
Execution Steps:
1. Download InstallCallback.zip and unzip the PowerShell Script. You may want to open and review the script in a text editor to ensure it's safe.
2. Run the script without parameters to install the callback.
3. If needed, uninstall the callback using the "UnInstall" parameter.
Script Details: The script creates a self-signed SSL certificate, installs it on the local machine and activates incoming HTTPS on port 10078. It also adds an entry to the hosts file, redirecting the hostname "callback.layer2.de" to your localhost machine. This allows the Cloud Connector to process the callback as if it was a web application.
Step 2 - configure QuickBooks Online
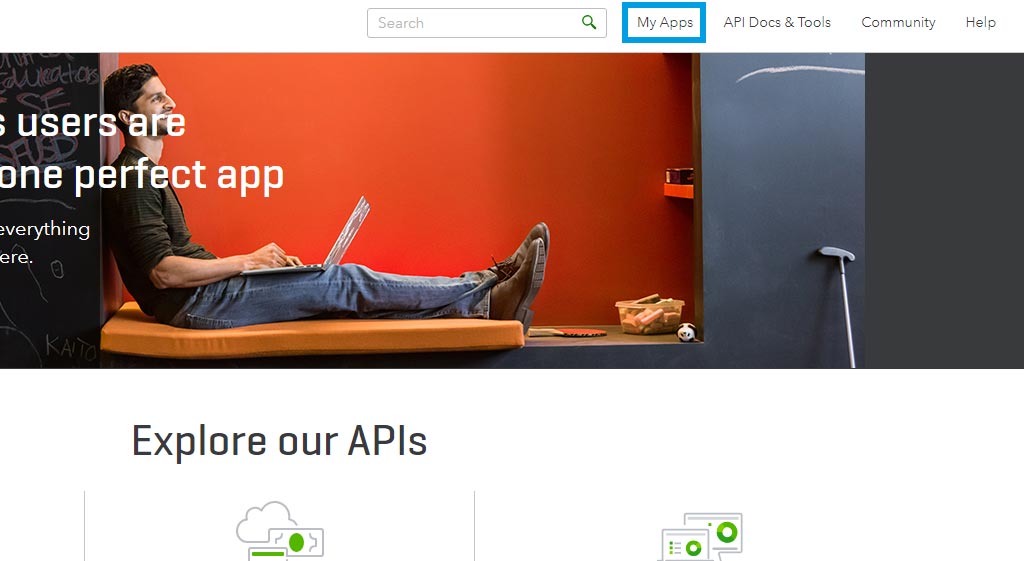
You need these steps to create your own app. Go to your developer account for Quickbooks https://developer.intuit.com.
Create a new app, providing a name, and select the scope com.intuit.quickbooks.accounting.
In the app settings (Key & Credentials), copy Client ID and Client Secret.
Then add the redirect URL https://callback.layer2.de:10078
Step 3 - configure Layer2 Cloud Connector to set up your QuickBooks and SharePoint connection
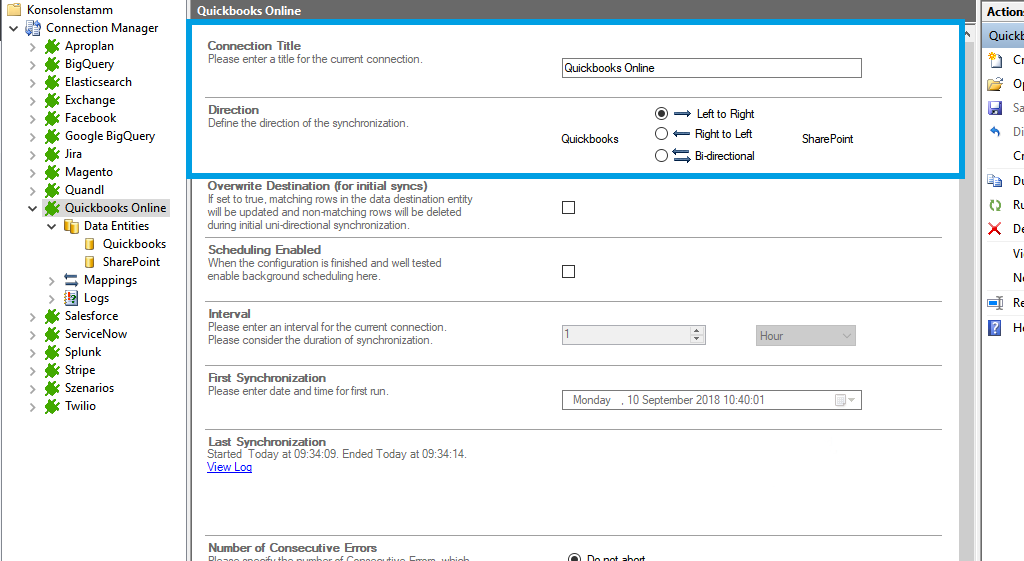
Create a new connection by using the Create New Connection option in the Actions pane (right-hand side). The new connection will appear at the bottom of the Connection Manager List (left-hand side). Click on your newly created connection to open the connection configuration settings.
Choose a meaningful name for your connection and replace the current "New Connection" Connection Title with it.
Connections to QuickBooks Online can be bi-directional. An initial connection should always be uni-directional to assure that both data entities are identical before switching to bi-directional. Therefore, choose Left to Right as direction. You can change this setting after your initial synchronization finished successfully.
Step 4 - configure Data Entity 1
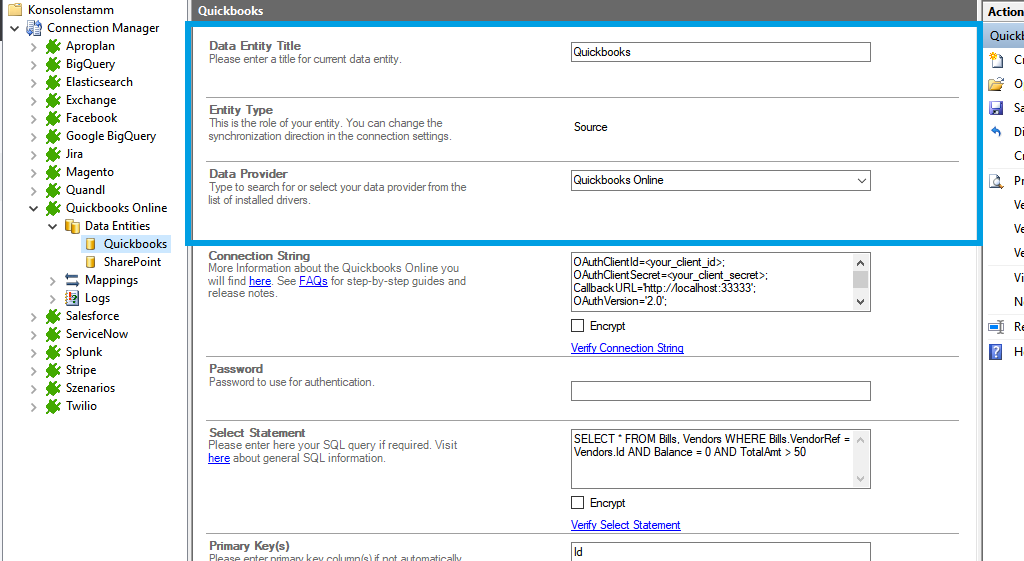
We will now set up our Data Entities. Go to the data entity “Data Entity 1” to open the configuration settings.
Choose a Data Entity Title. It is recommended giving your entities meaningful names to maintain an overview when you decide to set up multiple connections.
Select QuickBooks Online (Layer2) from the data provider list. You can search for Quickbooks Online by typing into the selection box.
OAuthClientId=yourclientid;OAuthClientSecret=yourclientsecret;InitiateOAuth=GETANDREFRESH;CallbackURL=redirecturifromyourapp;OAuthVersion=2.0;UseSandbox=true;
- "OAuthClientId;" this property defines the client id from step 1.
- "OAuthClientSecret;" this property defines the client secret from step 1.
- "InitiateOAuth;" set to GETANDREFRESH to automatically gets a new token.
- "CallbackURL;" points to the set URL in the application from step 1.
- "OAuthVersion;" sets the Auth Version. Use the 2.0.
- "UseSandbox;" set to true, if you are using the sandbox.
For the connection string, we need the in step 1 mentioned information.
You can copy the connection string and adjust it to match your gathered information. Use the Verify Connection String option to evaluate if the provided connection string is valid.
The Select Statement text box is used to define specific data queries. You can copy the select statement and adjust it to match your needs.
SELECT * FROM Bills, Vendors WHERE Bills.VendorRef = Vendors.Id AND Balance = 0 AND TotalAmt > 50
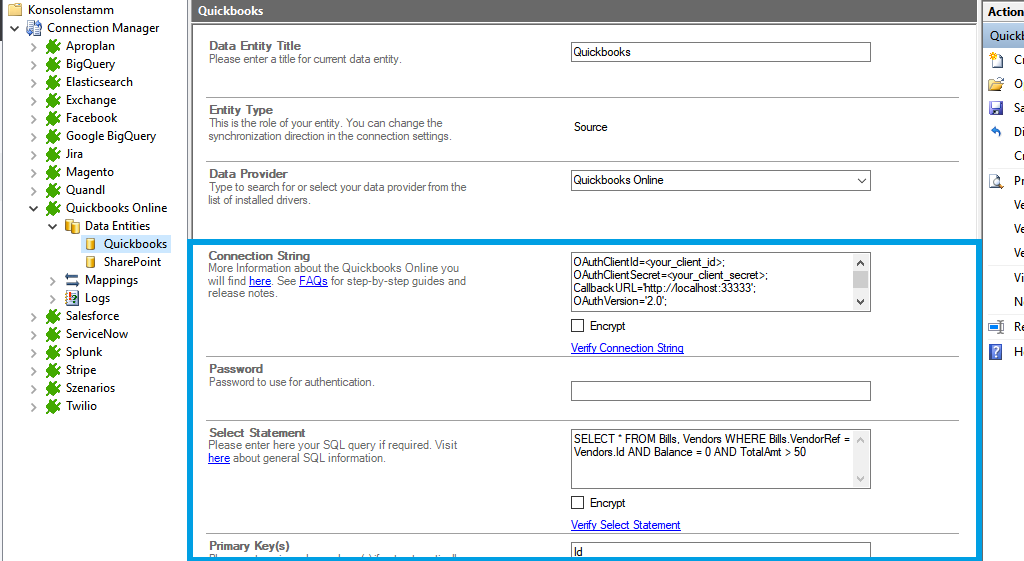
We will be gathering all bills and vendors where the vendor id is equal to the bill reference and with balance equals zero and totalamt greater than 50. Save your changes by using the right-hand pane option Save Changes.
To check if all necessary columns are received for your QuickBooks SharePoint connection, you can use the Preview Data option on the right-hand pane which will provide you with a pop-up window showing your sample data from your QuickBooks Online entity.

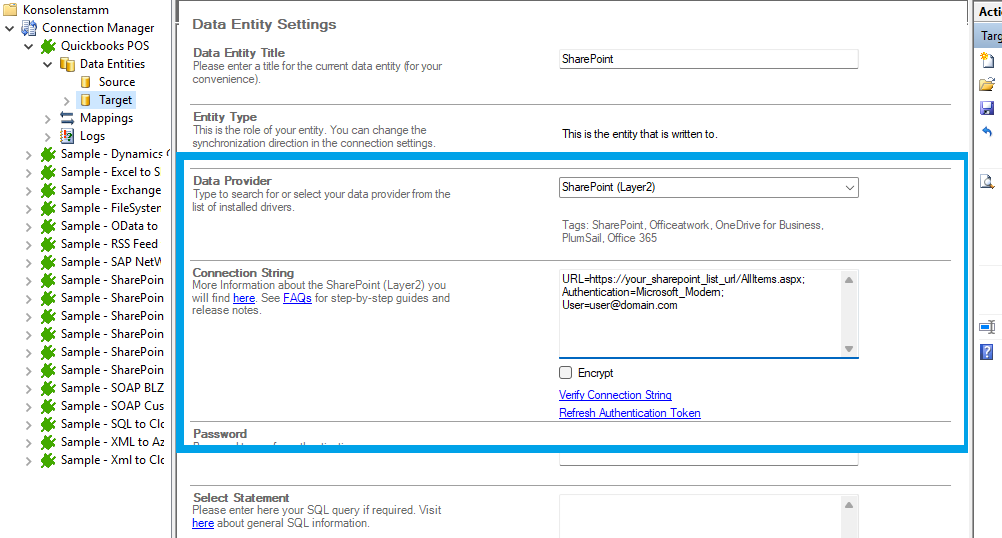
URL=https://your_custom_sharepoint_list_url/AllItems.aspx;Authentication=Microsoft_Modern;
- "URL=https://your_custom_sharepoint_url/AllItems.aspx;" this property defines the URL of your custom list that will be addressed.
- "Authentication=Microsoft_Modern;" this property will determine the authentication method used. Microsoft_Modern is the default authentication method to access Microsoft Office 365 / SharePoint Online and should work in most cases, even if the SharePoint site is connected to an ADFS. This authentication does not need any further connection string settings, other than the URL of the connected system.
- Optional: "User" parameter for information about the account that has been used for the authentication.
Step 5 - configure Data Entity 2
We are going to send the data to a custom SharePoint Online list. It's required that you set up this list prior to the next steps. Your list should contain matching columns according to your source entity.
You can copy the connection string which contains the minimum of required properties to connect to your custom SharePoint Online list.
Use the left-hand pane to switch to the data entity "Data Entity 2". We will be using the Layer2 SharePoint Provider for this setup.
For more information about the SharePoint provider visit: https://www.layer2solutions.com/support/cloud-connector-faqs/layer2-csom-sharepoint-ado-net-provider.
Save your changes by using the right-hand pane option Save Changes.
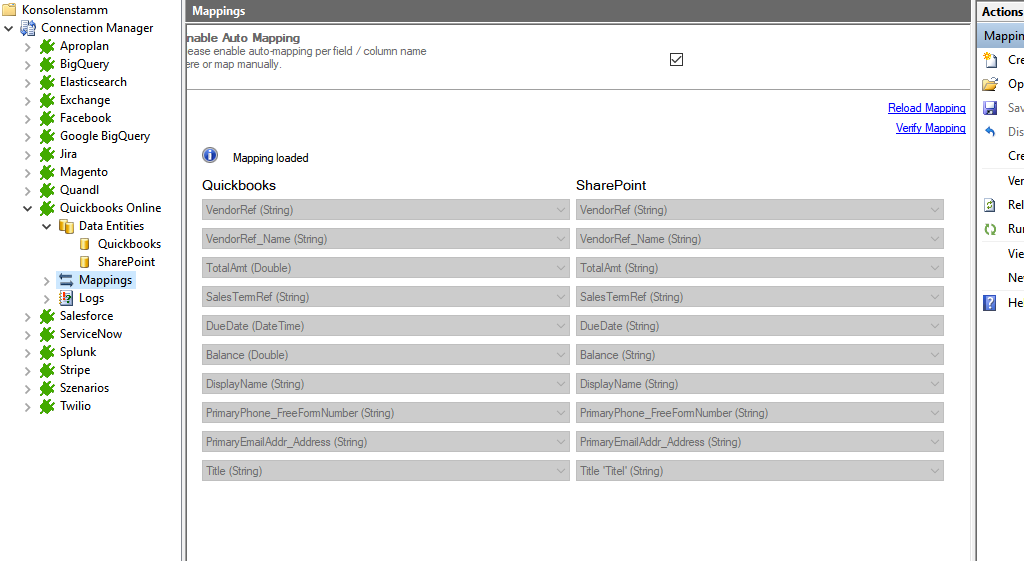
In the next step, we will configure our mapping settings. Click on the Mappings option on the left-hand pane. If your fields from SharePoint are named identical to the fields from your source system, the Enable Auto Mapping option will match those columns. Disabling this option allows you to match your columns as needed. We enabled auto-mapping in our setup. Save your changes by using the right-hand pane option Save Changes.
Step 6 - run your QuickBooks and SharePoint connection
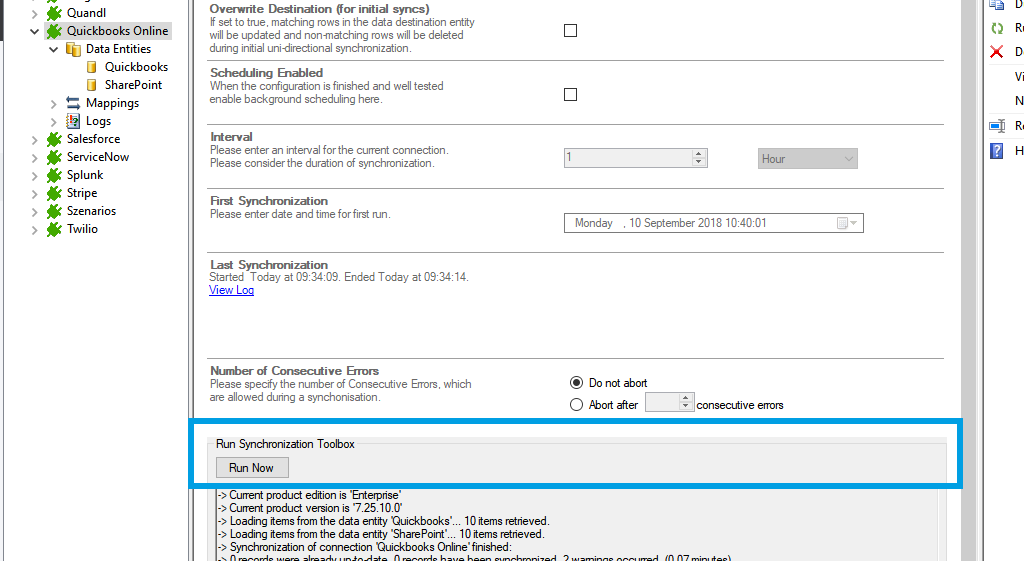
To run your connection between QuickBooks and SharePoint switch back to the main connection configuration node and use the Run Now Button located on the bottom of the setup page. The Run Synchronization Toolbox will also display the synchronization process.
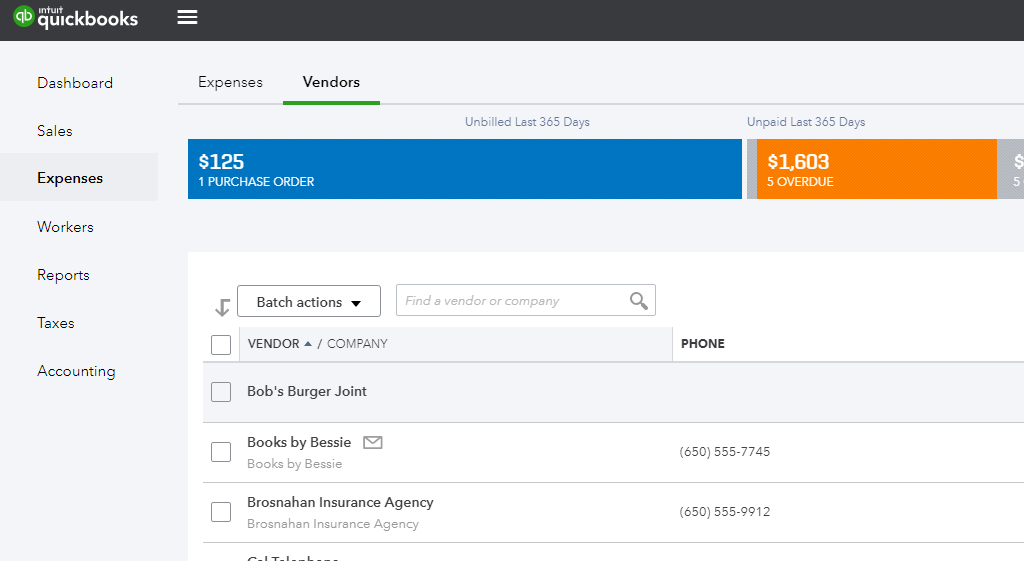
This is a data preview of the information we have access in our source entity.
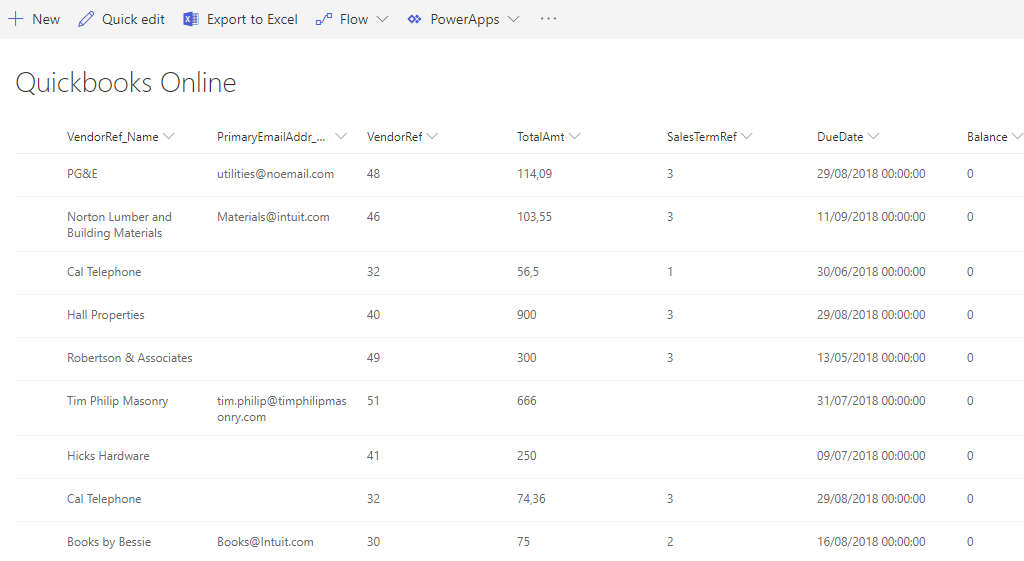
This will be the result in our SharePoint Online list after our initial successful synchronization.
If you want to use a bi-directional synchronisation, you can now switch your connection direction after our first initial synchronization run finished successfully. See section Hints and known issues below for more information.
Hints and known issues of connecting QuickBooks with SharePoint
Connection direction
As far as tested, this connection supports uni-directional as well as bi-directional synchronizations.
After adjusting the direction to bi-directional, you should check your Mappings settings again because some systems might include read-only columns that cannot be mapped directly.
We also recommend choosing a Conflict Resolution that matches your environments needs. You can find out more about the different conflict resolutions in our Layer2 Cloud Connector User Documentation
Data model
To see all the tables and views you can access with the Quickbooks Online provider, use these queries in the Select Statement:
SELECT * FROM sys_tables
SELECT * FROM sys_views
If there are more tables or views available, you can load them with the option "load more" in the popup window.
Batch operations
If you try to make multiple operations at the same time, you can get an error that batch operations not allowed. Set the parameter Other=’BatchSize=1’ in your connection string to avoid this error.
Pop-up
When clicking on Preview Data, some browser versions are not supported. You can change the selected browser version for the Preview Data pop-up window adding or changing a specific registry key in Windows.
Open your registry editor and follow this path:
HKEY_CURRENT_USER\Software\Microsoft\Internet Explorer\Main\FeatureControl\FEATURE_BROWSER_EMULATION
Create a new DWORD (32bit) with the name mmc.exe and set the decimal value to 11001. Restart the Cloud Connector.
You can find more information about it here.
Backend service and authentication
The connection to this system uses a custom authentication. The provider needs the running account connected to the backend service from the Cloud Connector.
Open services.msc and search for the Layer2 Cloud Connector Backend Service. Right-click on it and go to Properties. Set your account with the password in the tab Log On. Restart the service.
NOTE: if you update your Layer2 Cloud Connector, this step must be repeated.
Data integration and synchronization for QuickBooks and SharePoint
You can start your free Layer2 Cloud Connector trial now. Take the first step towards effortless connectivity. Experience how easy it can be to connect QuickBooks with SharePoint.
What is QuickBooks and SharePoint?
QuickBooks Online is a cloud-based accounting software developed by Intuit, designed to assist businesses in managing their finances, including tracking expenses, invoicing, payroll, and generating financial reports. It provides users with the flexibility to access their financial data securely from any device with an internet connection, facilitating remote work and collaboration among team members or accountants. Additionally, QuickBooks Online offers integrations with various banking institutions and third-party applications to streamline financial management processes further.
SharePoint, developed by Microsoft, is a versatile collaboration platform that enables organizations to create intranet sites, manage documents, and facilitate team collaboration effectively. It offers features such as document management, version control, workflows, and communication tools like blogs, wikis, and discussion boards. SharePoint empowers teams to access and share information securely from anywhere, promoting seamless collaboration and knowledge sharing across departments and locations. It integrates with other Microsoft products like Office 365, providing a comprehensive solution for enterprise collaboration and content management.
Advantages of using Layer2 Cloud Connector for a connection between QuickBooks and SharePoint
High security
Ensuring that sensitive financial data remains protected during the integration process.
Seamless connectivity
Maximizes business efficiency by enabling smooth data flow between QuickBooks and SharePoint.
Efficient work and increased productivity
Enhanced collaboration leads to more productivity and less mistakes.
Save time and money
With synchronization across platforms, businesses can save time and money by automating data transfer processes without manual intervention.
Synchronization your across platforms
Supporting over 150 systems and applications, Layer2 Cloud Connector provides extensive compatibility, allowing organizations to integrate QuickBooks and SharePoint effortlessly.
Simple collaborate with colleauges and partners
Once the connection is set up, the collaboration runs without you noticing anything from our tool, except that your data is always exactly where it should be.
Easy to set up
Its user-friendly interface makes it easy to set up connections between QuickBooks and SharePoint and also other systems.
Frequently asked questions about connecting QuickBooks and SharePoint
We will answer the most common questions about Quickbooks and SharePoint here.
Does QuickBooks work with SharePoint?
Yes, QuickBooks does work with SharePoint through integration tools like Layer2 Cloud Connector.
Does QuickBooks integrate with Microsoft?
QuickBooks does integrate with Microsoft products like SharePoint, enabling seamless data exchange and collaboration.
Can QuickBooks data be used with SharePoint?
QuickBooks data can be used with SharePoint through integration solutions that facilitate synchronization and access.
How long does it take to connect QuickBooks and SharePoint?
How long it takes to connect Quickbooks and SharePoint depends on the integration method chosen and the complexity of the setup. It takes 5 minutes to connect QuickBooks and SharePoint with tools like Layer2 Cloud Connector.

